
With the changing of every season, proper lawn care changes as well.
While your lawn will continue to grow throughout the fall, you also need to prepare it for the colder months.
While different regions require different approaches to lawn care, in the end, there are a number of simple steps you can take to make sure your lawn does more than survive the cooler months. With that in mind, we have put together some of our favorite advice and OMRI Listed® products for autumn lawn preparation.

The Basics of Fall Yard Care
1. Don’t neglect your raking.
Autumn means falling leaves. While many people look forward to the changing colors of the trees, raking has become a ritual chore of fall lawn care. But leaves are more than a nuisance. As fallen leaves decompose, they prevent light and air from reaching your lawn while creating a perfect environment for lawn-killing insects. If fallen leaves are sparse, you can use a mulching mower to break them down and convert them into a lawn-healthy top dressing. If your leaf cover is more extensive, you will need to collect and remove them from your lawn. Either way, make sure to keep up with your raking.
2. Use those leaves to your advantage.
While fallen leaves may be a chore, they can also be your best tool for a healthy lawn year-round. Turn your leaves into mulch or compost. Many lawn mowers feature baggers that can easily collect leaves for more extensive mulching. Or you can simply place your raked leaves in a composter where they can transform into rich soil. Flattened wet leaves are lawn killers, but properly composted leaves become easy — and free — material for sustaining a healthy lawn. Start your compost with a starter like Ringer® Compost Plus Compost Starter.
3. Take control of weeds.
Fall is the perfect time for applying weed prevention products, like Concern® Weed Prevention Plus®. Certain weeds, such as dandelions, begin growing in the fall, so you want to make sure you don’t limit weed prevention measures to the spring. Plus, a product like Concern® also contains fertilizer, designed to feed your lawn all year. Just make sure to follow the product instructions for application, as individual products are formulated differently.
How to Fertilize your Lawn in Autumn
Fertilizing is important in the fall. Fertilizers, like Ringer® Lawn Restore® II, help your lawn grow and sustain itself through the coming winter. But not every lawn requires the same fertilization schedule. Depending on where you live and what kind of grasses are featured in your lawn, you want to start your fertilization at different times. Here’s a quick guide to seasonally appropriate fertilization:
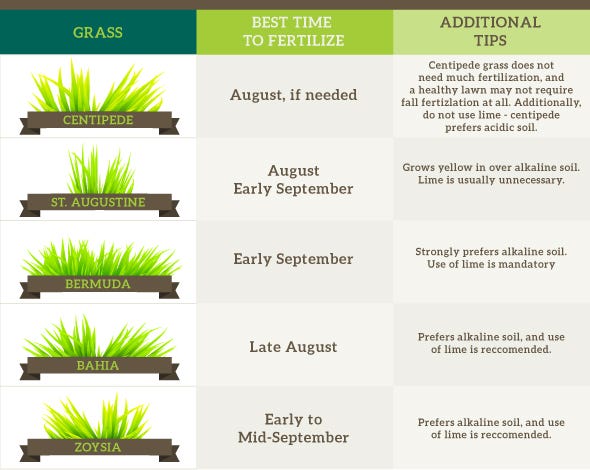
Fertilize Warm-season Lawns Early
If you live in the southern part of the country, you likely have a warm-season lawn. Certain warm-season grasses, such as centipede, St. Augustine, Bermuda, bahia, and zoysia, need to be fertilized earlier in the season. Specifically, you should perform your fertilizer regimen in July, August or September. But make sure you know how much fertilizer is optimal for your particular grass. For example, you don’t want to over-fertilize centipedegrass. Take a look at the figure below to determine what fertilization approach your particular grass needs:
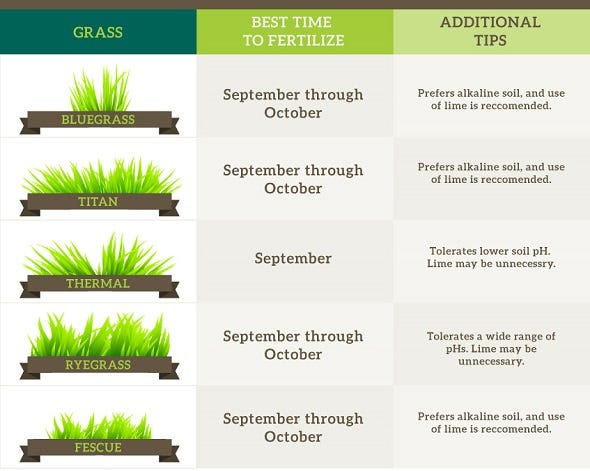
 Fertilize Cool-season Lawns Later
For individuals who live in the North, fall fertilization comes later. Cool-season grasses include bluegrass, Titan, Thermal, ryegrass and fescue. These grasses prefer to be fertilized from September to late October. In fact, in some cases, fertilizing these lawns during the summer can be detrimental. Keep in mind, cool-season lawns use standard fertilizer, but they just like it a little later in the year. Look for the best time to fertilize your grass below:
Don’t Forget to Mulch
Mulch shields your landscape from heat during the summer, but in autumn it helps retain heat in the ground.
Mulching is especially important if you live in a drier climate, as you will want to keep retaining moisture throughout the fall. Plus, mulch will assist you in weed prevention. So, even though mulching can seem daunting, doing it regularly will save you a lot of work later on.
Fall Lawn Care Tip: Groundcovers
If you have a shady or wet patch in your lawn that stunts grass growth, perennial ground covers can fill in the gaps. Mondo grass, juniper, or liriope will all survive in areas where grass won’t. Fall is the perfect time to start planting these year-round landscaping touches.
Winter will give your groundcover time to establish itself before the harsh summer. And while groundcovers are designed to be durable, they will grow more fully if you prepare the area by taking out weeds and fertilizing prior to planting.
Show Moss Who’s Boss
 Moss can impede grass growth. While it is harmless, it can thrive in areas where your lawn is struggling to grow. So if you want to reclaim that part of your lawn, you have to start by removing the invaders. And fall is the ideal time to remove any moss from your lawn. Here are some ways you can eliminate moss:
1. Start with a moss killer.
Moss killers, such as Safer® Brand Moss & Algae Killer & Surface Cleaner, are effective tools for taking care of pervasive moss. Plus, moss killers are also useful for removing lichens, grime, liverwort and algae from decks and surfaces. These products can be easily attached to a hose and spread evenly over your lawn.
2. Rake out the dead material.
After you have applied the moss-killer treatment, you need to remove the dead material. A simple rake will do the job. However, don’t make more work for yourself than you need to. This is a job perfectly paired with thatch removal, as both jobs require that your rake out dead plant material. So combine the work and save yourself some time and energy.
Remove Thatch From Your Grass
Thatch is that layer of stems and debris that builds up on any lawn between the soil surface and the top of your turf. Most of the time it goes unnoticed, but during the fall, when grass growth is more challenging, removing thatch will ensure your grass can survive the winter. If you’ve never attempted to remove thatch before, here’s where to start:
1. Lower your mower blades.
To begin, you should mow your lawn with your mower blades lowered to around an inch. This is generally half as high as you would normally mow your lawn. By cutting the grass lower, the dead debris will be easier to rake away. Plus, if you are planning on reseeding, the lower grass profile will allow seed to come directly in contact with the soil.
2. For large lawns, consider a vertical mower.
If you have a large lawn, a vertical mower will make dethatching a lot easier. While a standard mower features blades that run parallel with the turf, a vertical mower uses blades that run perpendicular. These specialty mowers can be rented from most home and garden stores, since they are used so infrequently.
3. For a small lawn, a thatching rake will do fine.
If your lawn is smaller, a thatching rake will likely be sufficient. These wire rakes are designed to penetrate the soil without damaging the turf. You can typically adjust the angle of the rake head to adjust the penetration. Combine dethatching with your regular raking to save time and energy.
4. Be mindful of how much you are removing.
If you have a large amount of thick thatch, removing it all in one treatment can do more damage than good. You don’t want to leave large areas — anything more than a couple of square inches — bare. If you notice that you are leaving holes in the turf, we recommend taking a break and letting your lawn recover for a while before returning to the job.
Aerate Your Lawn
Aeration is an important step in any fall lawn treatment regimen. It helps return oxygen and moisture to your lawn, which is especially important during the cooler months. But, while there are a lot of different aeration techniques you can choose from, some are better than others. Here are a few tips on how to aerate your lawn effectively:
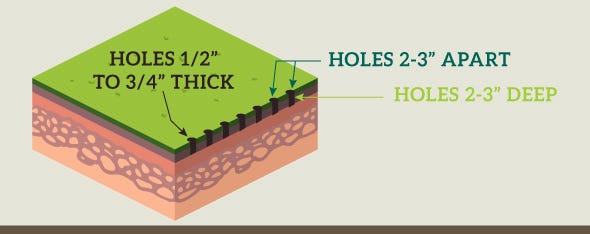
1. Plug aerators are better than spike aerators.
There are two basic aerating tools available. The first, a plug aerator, removes plugs of soil from the ground. Spike aerators simply poke holes in the ground. Unfortunately, spike aerators compact the soil, often causing more harm than good. Ideally, you want a plug aerator that removes holes 2 to 3 inches deep, 2 to 3 inches apart, and 1/2 to 3/4 inches thick.
2. Aerate right after it rains.
A dry lawn can be a pain to aerate. The softer the turf, the easier the job will be. So aerate a day or two after a good rain. You don’t want to be working in puddles and mud, but you do want the soil to be holding onto some moisture. If the weather doesn’t cooperate, simply water your lawn thoroughly the day before.
3. Break the plugs apart.
After you have used a plug aerator, you will notice that your lawn is full of soil plugs. Let those plugs dry in the sun a day or two, and then run them over with a lawn mower. This will break the plugs apart while also adding the soil back to your lawn. Just note that sometimes the plugs can be hard on your mower blades, so you may want to add blade sharpening to your autumn lawn routine.
4. Keep treating your lawn as usual.
After the aeration is complete, it’s important to continue routine lawn maintenance. If you aerate early in the autumn, keep mowing and watering as you normally would.
Fall Yard Care Repairs
Fall is also the perfect time to start repairing and reseeding thin and dead areas in your lawn. Fall seeding allows you to avoid many of the worst weeds while also giving seedlings the opportunity to start growing without the stress of the hot summer. For effective fall lawn treatment and repair, you can:
Start with over-seeding.
Over-seeding is simple. You spread loose grass seed over your lawn rather than rolling out new sod. This is an especially important step for those who live in cool-season climates. Warm-season grass typically doesn’t require over-seeding, although it can still be done if there are damaged areas in your lawn. Either way, make sure you mow your lawn short and remove the clippings first.
Be more aggressive on bare spots.
Over-seeding is great on the thin spots. But if you have truly bare areas in your lawn, you need to take a more direct approach. Mulch products embedded with seed are a great way to patch spots without fully re-sodding. Seed germination blankets are also a good option, especially if erosion is a concern. But sometimes, bare spots can only be replaced with new sod. Regardless, fall is the best time to do it.
Fall Lawn Care Tip: Top Dressing
A top dressing improves growing conditions. This thin layer of soil and organic matter will encourage further growth while reducing thatch. A standard top layer is made up of equal parts loam, sand and peat. But as mentioned above, a layer of well-chopped leaves can also serve as an effective top dressing.
Hopefully these fall lawn care tips have made the task of routine yard maintenance a little less daunting. With the right tools, the best products and a little time and energy, your lawn will become the envy of the neighborhood. So as the leaves begin to fall, start planning now to make the work more manageable and your lawn greener.


